

Have you ever had problems with pictures being over or under exposed? I’d love to help you understand why it happens and how to compensate for it.
Today is Part 1 in a series to help you tackle this problem.
QUICK REVIEW:
1) ISO refers back to the days of film and it tells you how much light you’ll need to take a shot. ISO 100 needs lots of light so it’s good to use for outdoor photography with lots of sunlight. (ISO 1600 and above needs less light and is good for nighttime photography.
2) Aperture (Av) refers to how big the opening in the shutter is. So an f-stop of 4.0 is wider and lets in more light than an f-stop of 22 which is very small and lets in very little light.
3) Time (Tv) refers to how long the shutter is open. A time of 1/1000 means one thousandth of a second. You can handhold a camera steady to about 1/25-1/30 of a second. Having a time value of 5 means the shutter is open for 5 seconds.
To help illustrate these relationships visually, consider COLLAGE 1 below.
I set the ISO on 100 for all three photos. Then, I also set the time at 1/30 of a second for all three.
This will help show how aperture affects your shots.
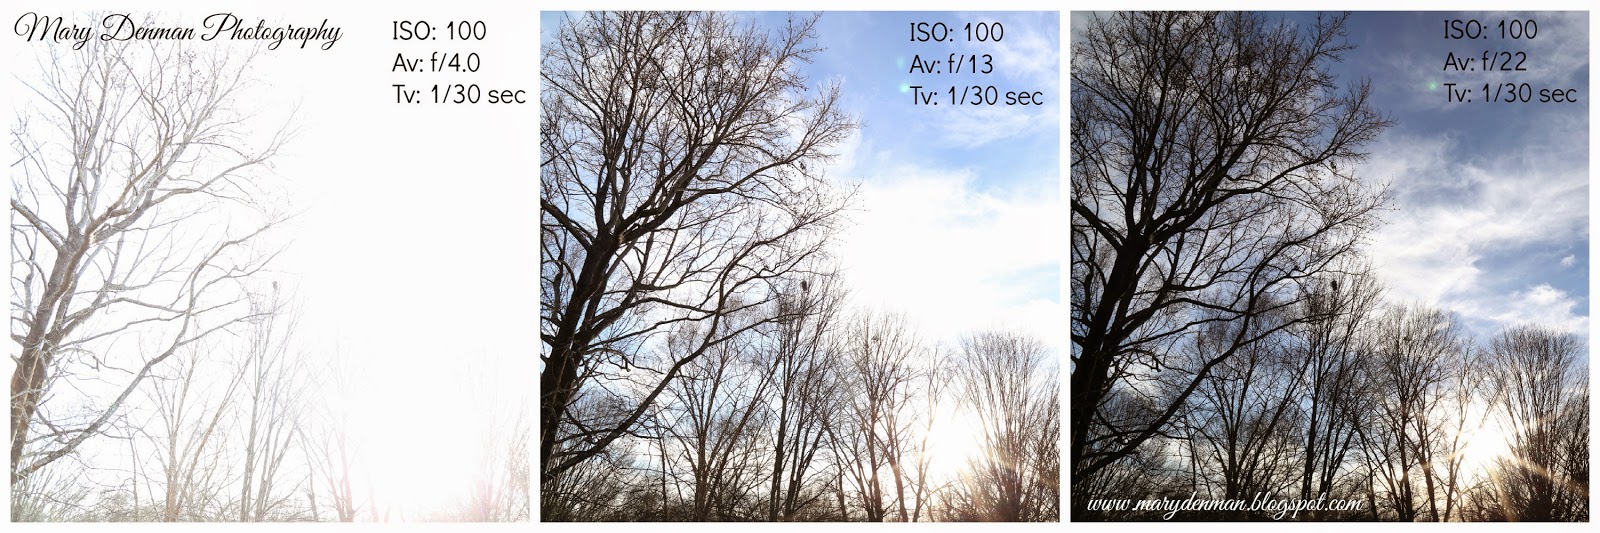
COLLAGE 1: Photos 1, 2, 3 by Mary Denman Photography
In Photo 1 of the above collage, the aperture is set at f/4.0 which means the shutter is open as wide as it can (for my lens) and so it lets in lots of light. This results in an over exposed photo. You can also say it’s washed out.
In Photo 2 of this collage, the aperture is set at f/13 which means the shutter is not open as wide. It has a smaller opening and lets in less light, but still leaves us with an over exposed shot.
In Photo 3 of this particular collage, by going to an aperture of f/22, this yields the best result of the three. See the definition of the clouds? The sky is also a deeper blue. This photo is more balanced in terms of definition and color. Because the opening of the shutter was small, f/22, the light that came in during the 1/30 of a second was enough to create a good shot.
Now, let’s move to COLLAGE 2.

COLLAGE 2: Photos 1, 2, 3 by Mary Denman Photography
You may notice something interesting about these shots. They look very similar. Why is this? Let me explain.
Today is Part 1 in a series to help you tackle this problem.
I’m going to start by quickly touching on the different factors that affect a picture: Tv (Time Value), Av (Aperture Value), or ISO (speed of the ‘film’).
At the end of today’s post, I’ll leave links to older posts on Av, Tv, and ISO that go into more detail on each of them.
At the end of today’s post, I’ll leave links to older posts on Av, Tv, and ISO that go into more detail on each of them.
Once you understand how the Time, Aperture and ISO affect your photos, you will have some options for correcting the over/under exposure problem.
Let’s get started.
Let’s get started.
QUICK REVIEW:
1) ISO refers back to the days of film and it tells you how much light you’ll need to take a shot. ISO 100 needs lots of light so it’s good to use for outdoor photography with lots of sunlight. (ISO 1600 and above needs less light and is good for nighttime photography.
2) Aperture (Av) refers to how big the opening in the shutter is. So an f-stop of 4.0 is wider and lets in more light than an f-stop of 22 which is very small and lets in very little light.
3) Time (Tv) refers to how long the shutter is open. A time of 1/1000 means one thousandth of a second. You can handhold a camera steady to about 1/25-1/30 of a second. Having a time value of 5 means the shutter is open for 5 seconds.
To help illustrate these relationships visually, consider COLLAGE 1 below.
I set the ISO on 100 for all three photos. Then, I also set the time at 1/30 of a second for all three.
This will help show how aperture affects your shots.
COLLAGE 1: Photos 1, 2, 3 by Mary Denman Photography
In Photo 1 of the above collage, the aperture is set at f/4.0 which means the shutter is open as wide as it can (for my lens) and so it lets in lots of light. This results in an over exposed photo. You can also say it’s washed out.
In Photo 2 of this collage, the aperture is set at f/13 which means the shutter is not open as wide. It has a smaller opening and lets in less light, but still leaves us with an over exposed shot.
In Photo 3 of this particular collage, by going to an aperture of f/22, this yields the best result of the three. See the definition of the clouds? The sky is also a deeper blue. This photo is more balanced in terms of definition and color. Because the opening of the shutter was small, f/22, the light that came in during the 1/30 of a second was enough to create a good shot.
Now, let’s move to COLLAGE 2.
COLLAGE 2: Photos 1, 2, 3 by Mary Denman Photography
You may notice something interesting about these shots. They look very similar. Why is this? Let me explain.
I set my camera on Aperture Mode. This means I could change the aperture as I wanted to. So I set the ISO at 100. Then, I changed the aperture for each shot (f/4.0, f/11, and f/22).
In order to have the photos be exposed properly, and since I had put it on Aperture mode, the camera chose the exposure or time.
In Photo 1, see how the first picture has a time of 1/4000 of a second and is the fastest of the three shots? This is because the aperture of f/4.0 lets in the most light. Therefore, the shutter had to move quickly to let in just a little light so the shot wasn’t over exposed.
In Photo 2, where I set the aperture on f/11, notice that the time is slower at 1/500th of a second. Because f/11 lets in less light than f/4.0, the shutter needed to stay open longer to get the correct exposure.
In Photo 3, at f/22, which lets in the least amount of light because the shutter opening is the smallest, the shutter had to stay open the longest of these three settings. It was open for 1/125 of a second as compared to 1/4000 of a second for f/4.0.
Hopefully, these two series of pictures will help you understand the relationship between aperture and time.
TIPS TO REMEMBER ABOUT APERTURE:
1) The lower the f-stop (f/4.0), the more light the shutter lets in.
2) The higher the f-stop, (f/22), the less light the shutter lets in.
While this post is a little more technical, it can help you understand more about your camera and hopefully encourage you to experiment. Next week’s post, part 2, will provide tips to help you fix shots that you take that are over or under exposed at the time you take them.
Understanding where your camera/cell phone focuses will also help you take more photos you’re happy with! I will cover that in part 2 as well.
Previous posts:
Hope this post helps.
Keep on clicking.
Mary
WEEKEND BLOGS I JOIN:


No comments:
Post a Comment