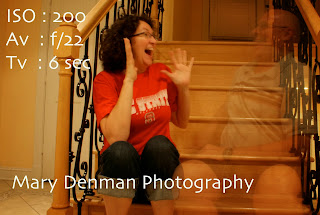
With Halloween fast approaching, I decided to teach you how to create ghostly photographic images.
I learned this photo technique from my brother (who is in these shots with me) way back in the 80's. On film.
I finally realized I could duplicate it on digital. These are some old shots from 2008.
Come back for Wordless Wednesday where I will show you some current shots!
So, today's tip will definitely be more technical. But worth it.
Let's get started!
In order to create an image that you can see through, you will need certain conditions.
1) It's much easier at night or in a dark room. You can't really recreate the ghostly images in bright light.
2) A tripod or stable surface to leave your camera on.
3) The ability to use your Bulb (B) setting on your camera.
4) Willing subjects.
Now to the pictures!
As you can see, I'm sitting on steps. But I look like a ghost...
This shot was taken at night.
I played around and settled on ISO 200 for the shot. If you get the ISO up to 1600, it won't require too much light and then you can't leave the shutter open for long enough to move out of the picture.
I set the Aperture on f/22 which lets a smaller amount of light in so the shutter could be open long enough without it being over exposed.
Here I am with my oldest brother.
So, how do you get a ghostly image with no post picture editing?
Simple. Notice the time the shutter was open....4.5 seconds.
My brother sat as still as he could (but he is a tad blurry.) I sat in the picture for about 2 seconds then bolted out of the shot.
The result is that he is captured normally, but my image AND the stairs behind me are also captured in the long exposure. I become a ghost.
 Of course we had to be silly.
Again, notice I'm a tad blurry since I had to sit still for 6 seconds. Notice I could be an actress with all the shock on my face....
We couldn't help but laugh. It was so much fun to do.
So, give it a try. Start with the ISO, time and Aperture that I used. Then, modify as needed.
Not sure what ISO and Aperture mean? Check out my blog posts that explain them here:
PART 1
PART 2
PART 3
You will have to take a few shots to get it right. But at least with digital, you can see what you did immediately. When my brother and I did this in the 80's, you had to wait til the film was developed to see if you had done it right.
Hope this tip helps!
Keep on clicking!
Mary


Very fun, Mary!
ReplyDeleteThanks for dropping by June! Your pumpkin spice turtles looked great!
DeleteLove it! I'll have to give this a try.
ReplyDeleteIt's fun Karen! Show me what your shots after you take them.
DeleteWow! Very cool! I'll have to show this to my daughter, Rebekah. She's the photographer in the family! Thanks for sharing this info at Friendship Friday!
ReplyDeleteHi Sylvia, I hope they turn out well! Thanks for dropping by.
Delete