by Mary Denman
Twitter @MaryDenman
Instagram @Maryfdenman
Today, I decided to teach you how to create ghostly photographic images.
I learned this photo technique from my brother way back in the 80's. On film.
I finally realized I could duplicate it on digital.
So, today's tip will definitely be more technical. But worth it.
Let's get started!
Showing posts with label Friday photo tip. Show all posts
Showing posts with label Friday photo tip. Show all posts
10.31.2014
10.25.2013
Photo Tip Friday - Creating Ghostly Photographic Images
Welcome Back!
With Halloween fast approaching, I decided to teach you how to create ghostly photographic images.
I learned this photo technique from my brother (who is in these shots with me) way back in the 80's. On film.
I finally realized I could duplicate it on digital. These are some old shots from 2008.
Come back for Wordless Wednesday where I will show you some current shots!
So, today's tip will definitely be more technical. But worth it.
Let's get started!
In order to create an image that you can see through, you will need certain conditions.
1) It's much easier at night or in a dark room. You can't really recreate the ghostly images in bright light.
2) A tripod or stable surface to leave your camera on.
3) The ability to use your Bulb (B) setting on your camera.
4) Willing subjects.
Now to the pictures!
As you can see, I'm sitting on steps. But I look like a ghost...
This shot was taken at night.
I played around and settled on ISO 200 for the shot. If you get the ISO up to 1600, it won't require too much light and then you can't leave the shutter open for long enough to move out of the picture.
I set the Aperture on f/22 which lets a smaller amount of light in so the shutter could be open long enough without it being over exposed.
Here I am with my oldest brother.
So, how do you get a ghostly image with no post picture editing?
Simple. Notice the time the shutter was open....4.5 seconds.
My brother sat as still as he could (but he is a tad blurry.) I sat in the picture for about 2 seconds then bolted out of the shot.
The result is that he is captured normally, but my image AND the stairs behind me are also captured in the long exposure. I become a ghost.
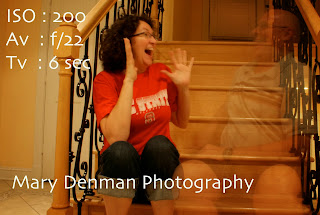 Of course we had to be silly.
Again, notice I'm a tad blurry since I had to sit still for 6 seconds. Notice I could be an actress with all the shock on my face....
We couldn't help but laugh. It was so much fun to do.
So, give it a try. Start with the ISO, time and Aperture that I used. Then, modify as needed.
Not sure what ISO and Aperture mean? Check out my blog posts that explain them here:
PART 1
PART 2
PART 3
You will have to take a few shots to get it right. But at least with digital, you can see what you did immediately. When my brother and I did this in the 80's, you had to wait til the film was developed to see if you had done it right.
Hope this tip helps!
Keep on clicking!
Mary
With Halloween fast approaching, I decided to teach you how to create ghostly photographic images.
I learned this photo technique from my brother (who is in these shots with me) way back in the 80's. On film.
I finally realized I could duplicate it on digital. These are some old shots from 2008.
Come back for Wordless Wednesday where I will show you some current shots!
So, today's tip will definitely be more technical. But worth it.
Let's get started!
In order to create an image that you can see through, you will need certain conditions.
1) It's much easier at night or in a dark room. You can't really recreate the ghostly images in bright light.
2) A tripod or stable surface to leave your camera on.
3) The ability to use your Bulb (B) setting on your camera.
4) Willing subjects.
Now to the pictures!
As you can see, I'm sitting on steps. But I look like a ghost...
This shot was taken at night.
I played around and settled on ISO 200 for the shot. If you get the ISO up to 1600, it won't require too much light and then you can't leave the shutter open for long enough to move out of the picture.
I set the Aperture on f/22 which lets a smaller amount of light in so the shutter could be open long enough without it being over exposed.
Here I am with my oldest brother.
So, how do you get a ghostly image with no post picture editing?
Simple. Notice the time the shutter was open....4.5 seconds.
My brother sat as still as he could (but he is a tad blurry.) I sat in the picture for about 2 seconds then bolted out of the shot.
The result is that he is captured normally, but my image AND the stairs behind me are also captured in the long exposure. I become a ghost.
 Of course we had to be silly.
Again, notice I'm a tad blurry since I had to sit still for 6 seconds. Notice I could be an actress with all the shock on my face....
We couldn't help but laugh. It was so much fun to do.
So, give it a try. Start with the ISO, time and Aperture that I used. Then, modify as needed.
Not sure what ISO and Aperture mean? Check out my blog posts that explain them here:
PART 1
PART 2
PART 3
You will have to take a few shots to get it right. But at least with digital, you can see what you did immediately. When my brother and I did this in the 80's, you had to wait til the film was developed to see if you had done it right.
Hope this tip helps!
Keep on clicking!
Mary
9.12.2013
Friday's Photo Tip - Do a Photo Shoot
You'll have to pardon my abbreviated post today.
Between actually totally losing my internet at home for several days and traveling to a writer's conference and my computer having hiccups, I can't do the photo tips on Portrait versus Landscape as much justice as I want. So part 2 will be next Friday.
But in the meantime, I have an assignment for you.
Since you most likely are using a digital camera, you can take pictures and look at them immediately. Right?
Well, grab you camera and go play for 5 minutes.

Pick a subject like: tv remote, a pretty plant, your kids, the office windows, food, your keyboard...basically, anything that strikes your fancy.
Then just start taking pictures.
 Take a Portrait and Landscape shot of the item.
Take 4 different angles: above the item, even with the item, below the item, beside the item.
Shine a light on it.
Create a shadow over it.
Think creatively!
Experiment!
Hit me with your best shot!
Leave me a link and let me see what you did.
Until then, keep on clicking!
Mary
Between actually totally losing my internet at home for several days and traveling to a writer's conference and my computer having hiccups, I can't do the photo tips on Portrait versus Landscape as much justice as I want. So part 2 will be next Friday.
But in the meantime, I have an assignment for you.
Since you most likely are using a digital camera, you can take pictures and look at them immediately. Right?
Well, grab you camera and go play for 5 minutes.

Pick a subject like: tv remote, a pretty plant, your kids, the office windows, food, your keyboard...basically, anything that strikes your fancy.
Then just start taking pictures.
 Take a Portrait and Landscape shot of the item.
 Take 4 different angles: above the item, even with the item, below the item, beside the item.
Shine a light on it.
Create a shadow over it.
Think creatively!
Experiment!
Hit me with your best shot!
Leave me a link and let me see what you did.
Until then, keep on clicking!
Mary
9.06.2013
Photo Tip Friday - Landscape vs Portrait Shots, Part 1
Welcome back to my Friday photography tips!
Today, we're going to look at the same subject taken in both a landscape (horizontal) and portrait (vertical) orientation and you get to pick which one you like better.
Next week, I'll go over more pictures and give you more tips to help decide which format to use in Part 2.
Ready? Let's go.

This is a picture I took from our car (I was the passenger) while we were driving over a bridge. The first shot I took was vertical or portrait.

Then, I managed to avoid all the bridge parts to get a horizontal or landscape picture.
So, which do you like better and why?

And here is some really cool, old brick in Charleston, SC. This is the kind of shot that would make a neat background for something on the computer.
Here it is in portrait.

Here it is in landscape.
Again, which do you think looks better and why?
I want you to start thinking about this. Next week, in part 2, I'll give you concrete ways to decide which direction to use.
Leave your answers in the comment section below!
Hope this tips helps!
Keep on clicking!
Mary
Today, we're going to look at the same subject taken in both a landscape (horizontal) and portrait (vertical) orientation and you get to pick which one you like better.
Next week, I'll go over more pictures and give you more tips to help decide which format to use in Part 2.
Ready? Let's go.

This is a picture I took from our car (I was the passenger) while we were driving over a bridge. The first shot I took was vertical or portrait.

Then, I managed to avoid all the bridge parts to get a horizontal or landscape picture.
So, which do you like better and why?

And here is some really cool, old brick in Charleston, SC. This is the kind of shot that would make a neat background for something on the computer.
Here it is in portrait.

Here it is in landscape.
Again, which do you think looks better and why?
I want you to start thinking about this. Next week, in part 2, I'll give you concrete ways to decide which direction to use.
Leave your answers in the comment section below!
Hope this tips helps!
Keep on clicking!
Mary
8.30.2013
Photo Tip Friday - Documenting Life
Welcome back to Photo Tip Friday!
Today's tips are designed to help you help you see how to photograph your daily life for special events.
Let's get started.
 On a beach trip to the Outer Banks, we took our kids to the Lost Colony. First, we participated in a demonstration of how to pack "gunpowder" like the settlers did. With this picture, I made sure to get all the cousins in the shot along with the instructor.
I stood behind the National Park Ranger and got the faces of my kids and nieces and nephews.
I took this one more on the level of the kids.
Notice how I framed this one?
I got the entire Ranger and all the kids, but cut out as much clutter as I could.
I got the entire Ranger and all the kids, but cut out as much clutter as I could.
But I took this photograph while I was standing. Compare it to the one above. Notice the different feel of the shot?
This shot is above, looking down. I like the perspective this angle provides.
You can see the young man working hard to roll the paper on the stick.

Here, I bent down and once again took a shot on level with the kids. While you don't see all the "gunpowder" and supplies in this photo, you do see his face and hands at work!
Try different perspectives with photography!!
Here are the supplies each child had to use.
I wanted to document that since all the parts would be hard to remember without a list!
They had a good time making the shots for the weapons.
After the demonstration, we went out to explore. On the way back in, my son pulled out a flat piece of metal and said, "Mom, doesn't this look like the letter Z?" I looked and agreed it did. He also showed me a piece of old brick.
But then I said, "Sweetie, this is a National Park, we need to give that to the Rangers. We can't take it home."

This is the happy Ranger. When we showed him the finds, he wanted to see where they came from because they were definitely man-made.
He was so excited to find metal fragments.
We all pitched in and found him lots more.
He couldn't wait to show it to the archeologists for identification!
So, once back in the Ranger Station, one of my nieces explored the metal.
I took this shot up close, with all the treasures we found in the foreground.
I love how she's looking so closely at the metal shards.
So as you go through life, take your camera along and document life as it happens.
Take overall shots like the first ones above.
But then go in closer and take shots of the details.
You'll be glad when you're looking back.
So which shot is your favorite of these?
Hope this tip helps!
Keep on clicking!
Mary
8.16.2013
Photo Tip Friday - Shooting in Low Light Pt. 2
Today's tip is about taking shots in dim lighting.
This week is PART 2 and we're going to cover photography in an indoor setting.
You can read PART 1 on outdoor photography in low lighting here.
Taking photographs in low light can be challenging.
So, here's a quick reminder.
Time Value = how long the shutter is open to let light in
Aperture Value = what size the aperture (shutter) is:
f/5.6 lets in more light
f/22 lets in less
ISO = "speed" or "sensitivity" of the film:
100 ISO needs bright light - think SUN
1600 ISO needs less light - CANDLELIGHT
Let's go over some photos. You'll notice I put the Time, Aperture Value (Av) and ISO on each photograph. This is to help you learn these terms so you can start to experiment on your own!
 These first two shots were shot at 800 ISO which is a more "sensitive" speed of film. It doesn't need as much light. But because the stage lighting was so bright, ISO 800 allowed the picture to not be washed out. You can see the snowflakes on the wall.
And this shot also employs the silhouette technique. I wanted to create the feeling of being there, right in the middle of the stage setup.
Notice that this shot has the same Tv, Av, and ISO. But it has a different feel to it. I angled the shot to make it more interesting.
And notice that it's a little fuzzy. I was hand holding at 1/15 of a second. Remember that most people can hand hold a steady shot at only to 1/30th or 1/25th of a second. I wanted to show you that every shot I take is not crystal clear. But I like the feel of the photo.
And, if I had checked the picture a bit closer on the camera, I probably would have moved up to 1600 and retaken the shot. But photography is dynamic and every learns as they go!

Now we get to shots taken during the performance of a Christmas show. Notice the ISO is 3200. I needed the "speed" or higher "sensitive" nature of a higher ISO.
Why? Because I was sitting in a dark auditorium and wanted to make sure I stopped any motion from the people onstage. Especially of the soloist.
I zoomed in on the soloist and made sure I had the Christmas tree fully framed in the shot as well.
 But in this photo, I used a wider angle on my lens to make you feel like you're sitting in the audience. You can see the silhouettes of the people in the next row. I also got the entire choir in the shot. Then, I framed it on the left side with the Christmas tree and above with the spot lights.
It was a wonderful show.

And here is one of my favorites. Flames are never the same twice. I used an ISO of 1600 and focused in closely on the flame. That resulted in everything else being black.
So, I want you to play with your camera.
Look and see if you have setting that says Av which is Aperture Value. Start at the lowest setting of 100 ISO and take a shot. Then, move on up....200, 400, 800, 1600 and maybe 3200. Just sit right where you are and see how it affects the pictures.
Then, go somewhere dark and try the same thing. Adjust the Aperture Value and see what happens.
As always, if you have a shot you're proud of, leave me a link and I'll be happy to drop by! Or, if you want me to discuss something in particular, leave me a comment.
Hope this tip helps!
Keep on clicking!
Mary
This week is PART 2 and we're going to cover photography in an indoor setting.
You can read PART 1 on outdoor photography in low lighting here.
Taking photographs in low light can be challenging.
So, here's a quick reminder.
Time Value = how long the shutter is open to let light in
Aperture Value = what size the aperture (shutter) is:
f/5.6 lets in more light
f/22 lets in less
ISO = "speed" or "sensitivity" of the film:
100 ISO needs bright light - think SUN
1600 ISO needs less light - CANDLELIGHT
Let's go over some photos. You'll notice I put the Time, Aperture Value (Av) and ISO on each photograph. This is to help you learn these terms so you can start to experiment on your own!
 These first two shots were shot at 800 ISO which is a more "sensitive" speed of film. It doesn't need as much light. But because the stage lighting was so bright, ISO 800 allowed the picture to not be washed out. You can see the snowflakes on the wall.
 And this shot also employs the silhouette technique. I wanted to create the feeling of being there, right in the middle of the stage setup.
Notice that this shot has the same Tv, Av, and ISO. But it has a different feel to it. I angled the shot to make it more interesting.
And notice that it's a little fuzzy. I was hand holding at 1/15 of a second. Remember that most people can hand hold a steady shot at only to 1/30th or 1/25th of a second. I wanted to show you that every shot I take is not crystal clear. But I like the feel of the photo.
And, if I had checked the picture a bit closer on the camera, I probably would have moved up to 1600 and retaken the shot. But photography is dynamic and every learns as they go!

Now we get to shots taken during the performance of a Christmas show. Notice the ISO is 3200. I needed the "speed" or higher "sensitive" nature of a higher ISO.
Why? Because I was sitting in a dark auditorium and wanted to make sure I stopped any motion from the people onstage. Especially of the soloist.
I zoomed in on the soloist and made sure I had the Christmas tree fully framed in the shot as well.
 But in this photo, I used a wider angle on my lens to make you feel like you're sitting in the audience. You can see the silhouettes of the people in the next row. I also got the entire choir in the shot. Then, I framed it on the left side with the Christmas tree and above with the spot lights.
 It was a wonderful show.

And here is one of my favorites. Flames are never the same twice. I used an ISO of 1600 and focused in closely on the flame. That resulted in everything else being black.
So, I want you to play with your camera.
Look and see if you have setting that says Av which is Aperture Value. Start at the lowest setting of 100 ISO and take a shot. Then, move on up....200, 400, 800, 1600 and maybe 3200. Just sit right where you are and see how it affects the pictures.
Then, go somewhere dark and try the same thing. Adjust the Aperture Value and see what happens.
As always, if you have a shot you're proud of, leave me a link and I'll be happy to drop by! Or, if you want me to discuss something in particular, leave me a comment.
Hope this tip helps!
Keep on clicking!
Mary
7.26.2013
Photo Tip Friday - Using Silhouettes - Part 1
Today's Tip is about Using Silhouettes Part 1
Welcome back!
What I love about photography is that there are so many ways to take pictures.
So many ways to express or capture a feeling in particular moment.
And today's photography technique especially creates wonderful mood in shots.
Let's get started.
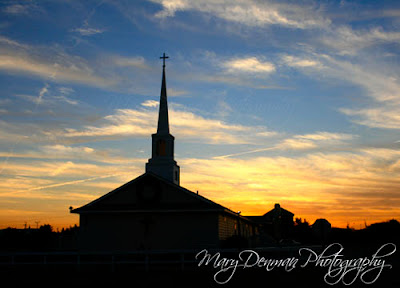 What's the first thing you notice about this and the next photograph?
Maybe the similar colors?
If that's your answer, you'd be correct.
So why is that?
Both of these shots were taken at sunset.
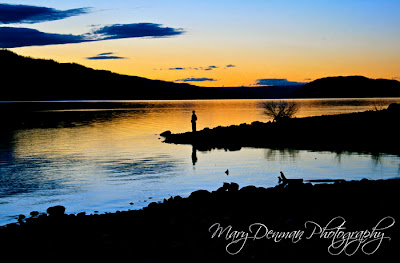 With the light coming from behind the church and behind the Grand Tetons, the foreground of each shot is almost completely blacked out, creating the silhouette effect.
And, in the second shot, notice I also used the reflection technique to advantage?
Here is one of my personal all-time favorite shots.
Why? Those are my kids. We were at an aquarium and they were just watching the fish. I stood across the room, waited for everyone else to move out of the shot and I snapped away.
Notice I said I waited. Not all shots happen the second you think of them, or notice the potential for a good shot. I got far enough back and just waited. Other people were walking through, but this picture was worth capturing.
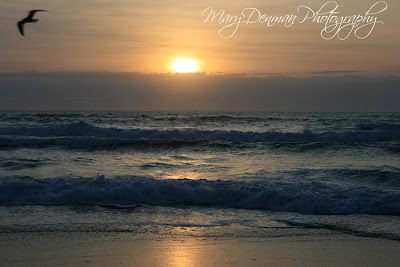 Here's another use of silhouette.
This is a sunrise shot and the silhouette is the bird. It's a seagull. You can't see the feathers or eyes of the bird, or even the color. But you can certainly feel the movement of the bird soaring.
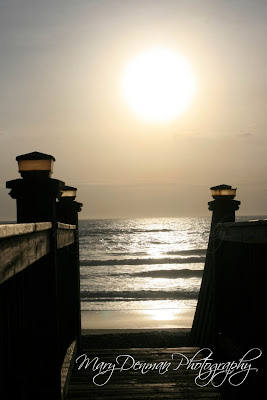
This is also the same morning. What I did was let the brilliance of the rising sun "wash out" the shot, causing the water to sparkle and the board walk to become very dark.
Again, this is creating the silhouette effect.
The strong lines of the man-made deck stand in stark contrast to the soft light of the sun and waves.
To me, the sun feels warm. It's almost like being there again.
So, to create a silhouette, you need to have the subject backlit.
In other words, have the light behind the object you're shooting.
The subject can be an object - the church, deck or mountains. Or people.
And you'll also notice that these are tricky lighting situations.
Either dimming light or direct bright light (the sun).
That requires a bit of technical explanation and I'll go into that next week in part 2. I'll teach you how to set your camera using the manual function or how to trick a point and shoot into taking these shots.
Which of these shots do you like best? As always, if you have a shot you want me to look at, leave me a link!
Go grab your camera!
Hope this tip helps.
Keep on clicking!
Mary
If you want to know more about a particular topic, leave me a comment and I will try to include it in an upcoming post!
Welcome back!
What I love about photography is that there are so many ways to take pictures.
So many ways to express or capture a feeling in particular moment.
And today's photography technique especially creates wonderful mood in shots.
Let's get started.
 What's the first thing you notice about this and the next photograph?
Maybe the similar colors?
If that's your answer, you'd be correct.
So why is that?
Both of these shots were taken at sunset.
 With the light coming from behind the church and behind the Grand Tetons, the foreground of each shot is almost completely blacked out, creating the silhouette effect.
 And, in the second shot, notice I also used the reflection technique to advantage?
Here is one of my personal all-time favorite shots.
Why? Those are my kids. We were at an aquarium and they were just watching the fish. I stood across the room, waited for everyone else to move out of the shot and I snapped away.
Notice I said I waited. Not all shots happen the second you think of them, or notice the potential for a good shot. I got far enough back and just waited. Other people were walking through, but this picture was worth capturing.
 Here's another use of silhouette.
 This is a sunrise shot and the silhouette is the bird. It's a seagull. You can't see the feathers or eyes of the bird, or even the color. But you can certainly feel the movement of the bird soaring.

This is also the same morning. What I did was let the brilliance of the rising sun "wash out" the shot, causing the water to sparkle and the board walk to become very dark.
Again, this is creating the silhouette effect.
The strong lines of the man-made deck stand in stark contrast to the soft light of the sun and waves.
To me, the sun feels warm. It's almost like being there again.
So, to create a silhouette, you need to have the subject backlit.
In other words, have the light behind the object you're shooting.
The subject can be an object - the church, deck or mountains. Or people.
And you'll also notice that these are tricky lighting situations.
Either dimming light or direct bright light (the sun).
That requires a bit of technical explanation and I'll go into that next week in part 2. I'll teach you how to set your camera using the manual function or how to trick a point and shoot into taking these shots.
Which of these shots do you like best? As always, if you have a shot you want me to look at, leave me a link!
Go grab your camera!
Hope this tip helps.
Keep on clicking!
Mary
Past Posts:
Discussing Some Photos (using the learned information)
Clink on the links above to go to those pages!
If you want to know more about a particular topic, leave me a comment and I will try to include it in an upcoming post!
Labels:
Friday photo tip,
Mary Denman,
Mary Denman Photography,
nature,
Photo Tip Friday,
photography technique,
photography tip,
photography tips,
Silhouettes in photography,
sunrises,
sunsets
Subscribe to:
Posts (Atom)


